我们都自称 CRUD boy 了,没有数据库拿什么 CRUD?
实验环境
简单起见,我们在本地搭建一个 MySQL 服务,使用brew install mysql即可安装,之后通过brew services start mysql即可启动 MySQL 服务。
相应的还可以通过brew services list查看运行中的服务,通过brew services stop mysql来停止 mysql 服务。如果是首次安装还需要执行mysql_secure_installation来初始化密码等。
建库建表
1
2
3
4
5
6
7
|
create database happyhacker;
use happyhacker;
create table employee (
	`id` int unsigned auto_increment primary key,
	`name` varchar(40) not null default '',
	`age` tinyint unsigned not null default 0
) engine=innodb default charset=utf8mb4;
|
JDBC
简单来讲 JDBC 就是一套操作数据库的 API(interface),它是不包含实现的(implementation)。各数据库供应商(如 MySQL 等)提供驱动(实现)来完成对数据库的操作。
JDBC 提供了两个功能:
- JDBC API 提供 Java 应用和 JDBC Manager 之间的通信
- JDBC driver 提供了 JDBC Manager 和数据库驱动之间的通信
我们先来感受一下使用原生的 JDBC 怎样操作数据库。
建立连接(Connection)
1
|
Connection connection = DriverManager.getConnection("jdbc:mysql://127.0.0.1:3306/happyhacker", "root", "12345678");
|
创建语句(Statement)
1
2
|
Statement stmt = connection.createStatement();
String sql = "select * from employee";
|
执行语句并返回结果(ResultSet)
1
|
ResultSet rs = stmt.executeQuery(sql);
|
对结果集进行迭代取出数据
1
2
3
4
5
6
7
|
while (rs.next()) {
  int id = rs.getInt("id");
  String name = rs.getString("name");
  int age = rs.getInt("age");

	System.out.printf("id: %d,\t name: %s,\t age: %d\n", id, name, age);
}
|
关闭连接和语句
1
2
|
stmt.close();
connection.close();
|
从上面的例子中也可以看出,通过 JDBC 对数据库的操作分为以下步骤:
- 建立连接(Connection)
- 建立语句(Statement)
- 执行语句并返回结果(ResultSet)
- 对结果集进行迭代取出数据
下面列出的完整代码包含对数据库的增删改查
 1
 2
 3
 4
 5
 6
 7
 8
 9
10
11
12
13
14
15
16
17
18
19
20
21
22
23
24
25
26
27
28
29
30
31
32
33
34
35
36
37
38
39
40
41
42
43
44
45
46
47
48
49
50
51
52
53
54
55
56
57
58
59
60
61
62
63
64
65
66
67
68
69
70
71
72
73
74
75
76
77
|
package fun.happyhacker.springbootdemo;

import java.sql.*;

public class JDBCTest {
    public static void main(String[] args) {

        jdbcTest();
    }

    private static void jdbcTest() {
        Connection connection = null;
        Statement stmt = null;

        try {
            Class.forName("com.mysql.cj.jdbc.Driver");
            connection = DriverManager.getConnection("jdbc:mysql://127.0.0.1:3306/happyhacker", "root", "12345678");
            stmt = connection.createStatement();
            String selectSql = "select * from employee";
            ResultSet rs = stmt.executeQuery(selectSql);

            while (rs.next()) {
                int id = rs.getInt("id");
                String name = rs.getString("name");
                int age = rs.getInt("age");

                System.out.printf("id: %d,\t name: %s,\t age: %d\n", id, name, age);
            }

            String insertSql = "insert into employee (`name`, `age`) values ('John', 13)";
            long effectedRows1 = stmt.executeUpdate(insertSql, new String[]{"id"});
            if (effectedRows1 > 0) {
                System.out.println("insert ok");
            } else {
                System.out.println("insert failed");
            }

            String updateSql = "update employee set `name` = 'Tam' where id = 3";
            long effectedRows2 = stmt.executeUpdate(updateSql);
            if (effectedRows2 > 0) {
                System.out.println("update ok");
            } else {
                System.out.println("update failed");
            }

            String deleteSql = "delete from employee where id = 5";
            long effectedRows3 = stmt.executeUpdate(deleteSql);
            if (effectedRows3 > 0) {
                System.out.println("delete ok");
            } else {
                System.out.println("delete failed");
            }

          	rs.close();
            stmt.close();
            connection.close();
        } catch (SQLException e) {
            e.printStackTrace();
        } finally {
            if (stmt != null) {
                try {
                    stmt.close();
                } catch (SQLException throwables) {
                    throwables.printStackTrace();
                }
            }
            if (connection != null) {
                try {
                    connection.close();
                } catch (SQLException throwables) {
                    throwables.printStackTrace();
                }
            }

        }
    }
}
|
不要忘了需要在pom.xml中添加如下依赖
1
2
3
4
5
|
<dependency>
  <groupId>mysql</groupId>
  <artifactId>mysql-connector-java</artifactId>
  <version>8.0.20</version>
</dependency>
|
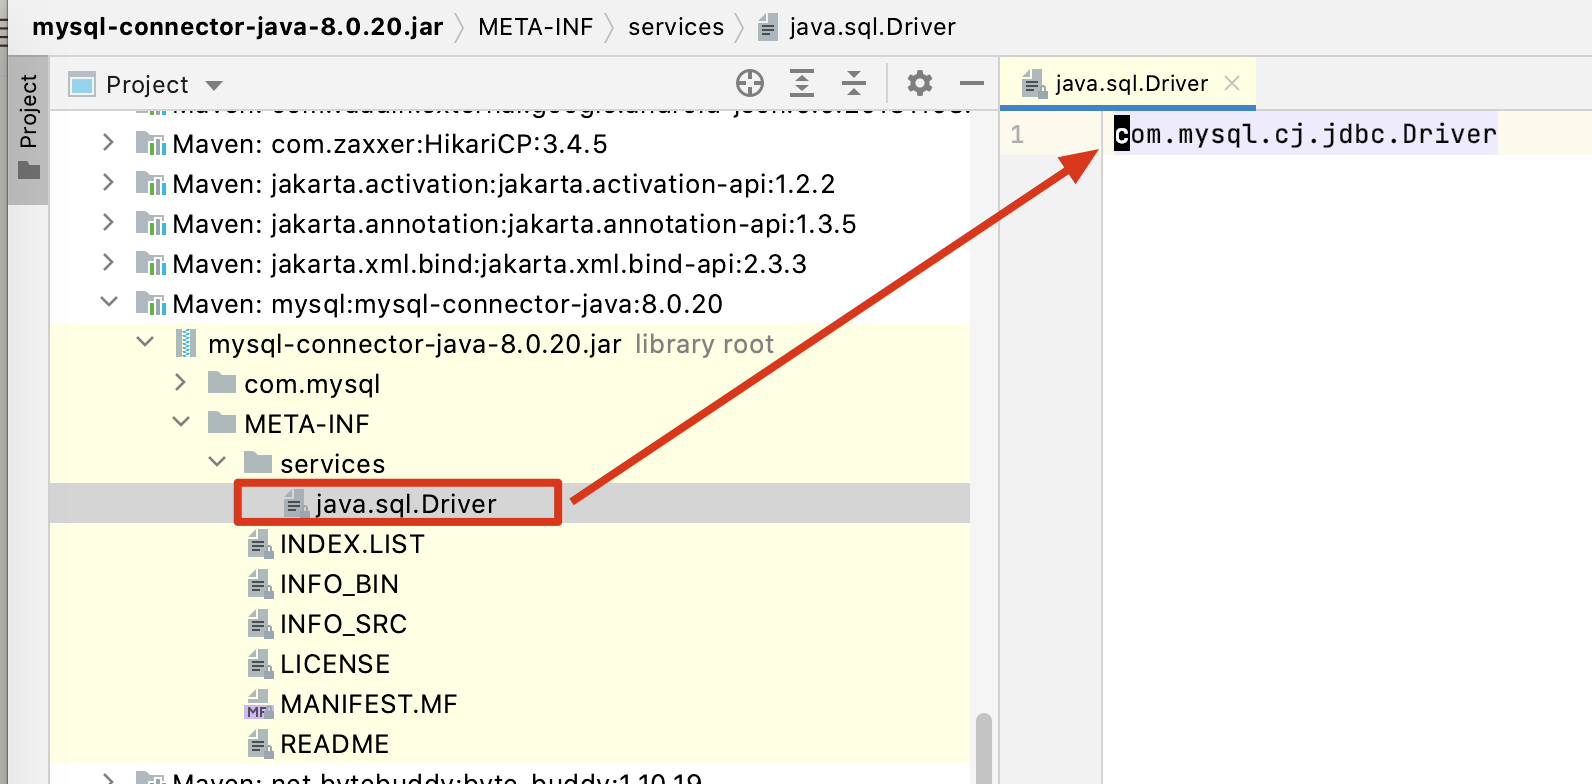
注意其中的Class.forName("com.mysql.cj.jdbc.Driver")这句,老的文档都会写这句,但其实使用新版的 MySQL Driver 的话这个已经不需要了,因为新版本有这个
连接池
前面我们看到Statement和Connection都是可以复用的,但这仅仅局限在一个方法中。想让一个连接在整个应用中都可用,就要把它做成全局变量。
最简单的做法就是这样
 1
 2
 3
 4
 5
 6
 7
 8
 9
10
11
|
package fun.happyhacker.springbootdemo.jdbc;

import java.sql.Connection;
import java.sql.DriverManager;
import java.sql.SQLException;

public class JDBCConnection {
    public static Connection getConnection() throws SQLException {
        return DriverManager.getConnection("jdbc:mysql://127.0.0.1:3306/happyhacker", "root", "12345678");
    }
}
|
这样在需要用它的地方直接调用JDBCConnection.getConnection()就可以了。但要注意用完之后可不要调用connection.close(),因为一旦 close 就无法再被别人使用了。
再往下需要考虑的东西就很多了,比如
- 用完之后不立即 close,那什么时候 close?
- 一个连接用多少次 close?
- 应用高并发的情况下不可能只用一个连接,多个连接如何保持?
- 连接异常断开后如何自动重连?
想想就觉得很复杂,好在这个问题已经有很完善的解决方案了。早前比较流行的有Apache 的 DBCP,老牌的 C3P0,打败它们俩的 BoneCP,后起之秀 Hikari CP等等,而 Hikari CP 得益于其优异的性能傲视群雄,目前已经是 Springboot 默认的连接池框架,搞的 BoneCP 的作者都公开声称不再更新了,建议大家去用 HikariCP。BoneCP 的 github 主页介绍只有这样一段了
BoneCP
BoneCP is a Java JDBC connection pool implementation that is tuned for high performance by minimizing lock contention to give greater throughput for your applications. It beats older connection pools such as C3P0 and DBCP but should now be considered deprecated in favour of HikariCP.
这是得多心灰意冷啊。所以我们直接 HikariCP 就行了。对了还有一个国产的阿里出品 Druid,说实话用了那么多开源的东西之后,对阿里家开源的东西还是要谨慎一些,这个东西文档不丰富,用户遇到了问题反馈了得不到回应。
最简单的数据库配置
最简单的配置就是使用 Springboot 内置的模板配置了,使用数据库需要引入一个依赖即可
1
2
3
4
|
        <dependency>
            <groupId>org.springframework.boot</groupId>
            <artifactId>spring-boot-starter-data-jdbc</artifactId>
        </dependency>
|
引入这个依赖就不用再引用 HikariCP 了。
然后在配置文件中加入这些
1
2
3
4
5
|
spring.datasource.type=com.zaxxer.hikari.HikariDataSource
spring.datasource.hikari.driver-class-name=com.mysql.cj.jdbc.Driver
spring.datasource.hikari.username=root
spring.datasource.url=jdbc:mysql://localhost:3306/happyhacker
spring.datasource.hikari.password=12345678
|
接下来就可以直接注入DataSource了。
 1
 2
 3
 4
 5
 6
 7
 8
 9
10
11
12
13
14
15
16
17
18
19
20
21
22
23
24
25
26
27
28
29
30
31
32
33
34
35
36
37
38
39
40
41
|
package fun.happyhacker.springbootdemo.controller;

import fun.happyhacker.springbootdemo.hikari.Employee;
import org.springframework.beans.factory.annotation.Autowired;
import org.springframework.web.bind.annotation.GetMapping;
import org.springframework.web.bind.annotation.RestController;

import javax.sql.DataSource;
import java.sql.Connection;
import java.sql.PreparedStatement;
import java.sql.ResultSet;
import java.sql.SQLException;
import java.util.ArrayList;
import java.util.List;

@RestController
public class EmployeeController {
    @Autowired
    private DataSource ds;

    @GetMapping("/list")
    public String list() {
        List<Employee> employees = new ArrayList<>();
        try (Connection connection = ds.getConnection();
             PreparedStatement ps = connection.prepareStatement("select * from employee");
             ResultSet rs = ps.executeQuery();
        ) {
            Employee employee = new Employee();
            while (rs.next()) {
                employee.setId(rs.getInt("id"));
                employee.setName(rs.getString("name"));
                employee.setAge(rs.getInt("age"));
                employees.add(employee);
            }
        } catch (SQLException throwables) {
            throwables.printStackTrace();
        }

        return employees.toString();
    }
}
|
这里提一个小问题,访问这个接口你会发现你的响应是这样的
1
|
[Employee(id=8, name=John, age=13), Employee(id=8, name=John, age=13), Employee(id=8, name=John, age=13), Employee(id=8, name=John, age=13), Employee(id=8, name=John, age=13), Employee(id=8, name=John, age=13), Employee(id=8, name=John, age=13)]
|
这和我们理解的 Json 是有区别的,更多信息可以参考实现 toJson() 方法
JPA和MyBatis
JPA本质就是Hibernate,是一个“轻量级”的ORM框架(至于是不是真的轻量,得看跟谁比)。上手还是非常简单的。
JPA入门——增删改查
引入依赖
1
2
3
4
5
6
7
8
9
|
        <dependency>
            <groupId>org.springframework.boot</groupId>
            <artifactId>spring-boot-starter-data-jpa</artifactId>
        </dependency>
        <dependency>
            <groupId>mysql</groupId>
            <artifactId>mysql-connector-java</artifactId>
            <version>8.0.20</version>
        </dependency>
|
添加配置 application.properties
1
2
3
4
5
6
7
8
|
spring.datasource.type=com.zaxxer.hikari.HikariDataSource
spring.datasource.hikari.driver-class-name=com.mysql.cj.jdbc.Driver
spring.datasource.hikari.username=root
spring.datasource.url=jdbc:mysql://localhost:3306/happyhacker?charset=utf8mb4
spring.datasource.hikari.password=12345678
spring.jpa.database-platform=org.hibernate.dialect.MySQL5InnoDBDialect
spring.jpa.show-sql=true
spring.jpa.hibernate.ddl-auto=validate
|
创建实体类
 1
 2
 3
 4
 5
 6
 7
 8
 9
10
11
12
13
14
15
16
17
18
19
|
package fun.happyhacker.springbootdemo.jpa.entity;

import lombok.Data;

import javax.persistence.*;

@Entity
@Table(name = "employee")
@Data
public class Employee {
    @Id
    @GeneratedValue
    private Long id;

    @Column(length = 32)
    private String name;

    private Integer age;
}
|
注意:上面的表名大小写不需区分,可以全部大写
创建Repository接口
 1
 2
 3
 4
 5
 6
 7
 8
 9
10
11
|
package fun.happyhacker.springbootdemo.jpa.repository;

import fun.happyhacker.springbootdemo.jpa.entity.Employee;
import org.springframework.data.jpa.repository.JpaRepository;
import org.springframework.stereotype.Repository;

import java.util.List;

@Repository
public interface EmployeeRepository extends JpaRepository<Employee, Long> {
}
|
验证功能
有了上面这些配置,就可以体验JPA带给你的强大功能了。
先看在Controller类中测试。
 1
 2
 3
 4
 5
 6
 7
 8
 9
10
11
12
13
14
15
16
17
18
19
20
21
22
23
24
25
26
27
28
29
30
31
32
33
34
35
36
37
38
|
package fun.happyhacker.springbootdemo.controller;

import fun.happyhacker.springbootdemo.hikari.ExtensionMethods;
import fun.happyhacker.springbootdemo.jpa.entity.Employee;
import fun.happyhacker.springbootdemo.jpa.repository.EmployeeRepository;
import lombok.experimental.ExtensionMethod;
import org.springframework.beans.factory.annotation.Autowired;
import org.springframework.web.bind.annotation.GetMapping;
import org.springframework.web.bind.annotation.RestController;

@RestController
@ExtensionMethod({ExtensionMethods.class})
public class EmployeeController {
    @Autowired
    private EmployeeRepository employeeRepository;

    @GetMapping("/list")
    public String list() {
        Employee john = new Employee();
        john.setAge(20);
        john.setName("John");

        Employee lam = new Employee();
        lam.setName("lam");
        lam.setAge(30);

        employeeRepository.save(john);
        employeeRepository.save(lam);

        Employee first = employeeRepository.getOne(1L);
        first.setName("happyhacker");
        employeeRepository.save(first);

        employeeRepository.deleteById(2L);

        return employeeRepository.findAll().toString();
    }
}
|
在看junit中的测试
 1
 2
 3
 4
 5
 6
 7
 8
 9
10
11
12
13
14
15
16
17
18
19
20
21
22
23
24
25
26
27
28
29
30
31
32
33
34
35
36
37
38
39
40
41
42
43
44
45
46
47
48
49
50
|
package fun.happyhacker.springbootdemo.jpa.repository;

import fun.happyhacker.springbootdemo.jpa.entity.Employee;
import org.junit.jupiter.api.Test;
import org.springframework.beans.factory.annotation.Autowired;
import org.springframework.boot.test.context.SpringBootTest;

import java.util.ArrayList;
import java.util.List;
import java.util.Optional;

import static org.junit.jupiter.api.Assertions.assertEquals;
import static org.junit.jupiter.api.Assertions.assertFalse;

@SpringBootTest
class EmployeeRepositoryTest {

    @Autowired
    private EmployeeRepository employeeRepository;

    @Test
    void crud() {
        Employee john = new Employee();
        john.setAge(20);
        john.setName("John");

        Employee lam = new Employee();
        lam.setName("lam");
        lam.setAge(30);

        Employee johnWithId = employeeRepository.save(john);
        assertEquals(john.getName(), johnWithId.getName());
        Employee lamWithId = employeeRepository.save(lam);
        assertEquals(lam.getName(), lamWithId.getName());

        lamWithId.setAge(45);
        Employee oldLam = employeeRepository.save(lamWithId);
        assertEquals(45, oldLam.getAge());

        employeeRepository.delete(oldLam);
        Optional<Employee> employeeOptional = employeeRepository.findById(2L);
        assertFalse(employeeOptional.isPresent());

        List<Employee> list = employeeRepository.findAll();
        List<Employee> expected = new ArrayList<>();
        expected.add(johnWithId);
        assertEquals(expected, list);

    }
}
|
JPA处理联合主键
JPA处理联合主键主要有两种方式,用法有区别,最终生成的SQL语句也有区别,具体用哪种方式主要看场景。
在典型的RBAC权限控制系统中会有很多联合主键的情况,下面来取一个简单的例子说明。
Role是角色,包含idRoleAccount是角色和员工的映射,其中包含roleId和accountId
@IdClass
 1
 2
 3
 4
 5
 6
 7
 8
 9
10
11
12
13
14
15
16
17
|
package fun.happyhacker.springbootdemo.jpa.idclass.entity;

import lombok.Data;

import javax.persistence.Entity;
import javax.persistence.GeneratedValue;
import javax.persistence.Id;

@Entity
@Data
public class Role {
    @Id
    @GeneratedValue
    private Integer id;

    private String name;
}
|
 1
 2
 3
 4
 5
 6
 7
 8
 9
10
11
12
13
14
15
16
17
18
19
|
package fun.happyhacker.springbootdemo.jpa.idclass.entity;

import lombok.Data;

import javax.persistence.Entity;
import javax.persistence.GeneratedValue;
import javax.persistence.Id;

@Entity
@Data
public class Account {
    @Id
    @GeneratedValue
    private Integer id;

    private String name;

    private Integer age;
}
|
 1
 2
 3
 4
 5
 6
 7
 8
 9
10
11
12
13
14
15
16
17
|
package fun.happyhacker.springbootdemo.jpa.idclass.entity;

import lombok.Data;

import javax.persistence.Entity;
import javax.persistence.Id;
import javax.persistence.IdClass;

@Entity
@Data
@IdClass(RoleAccountId.class)
public class RoleAccount {
    @Id
    private Integer roleId;
    @Id
    private Integer accountId;
}
|
 1
 2
 3
 4
 5
 6
 7
 8
 9
10
11
|
package fun.happyhacker.springbootdemo.jpa.idclass.entity;

import lombok.Data;

import java.io.Serializable;

@Data
public class RoleAccountId implements Serializable {
    private Integer roleId;
    private Integer accountId;
}
|
注意:联合主键类需要实现Serializable接口
1
2
3
4
5
6
7
8
|
package fun.happyhacker.springbootdemo.jpa.idclass.repository;

import fun.happyhacker.springbootdemo.jpa.idclass.entity.RoleAccount;
import fun.happyhacker.springbootdemo.jpa.idclass.entity.RoleAccountId;
import org.springframework.data.jpa.repository.JpaRepository;

public interface RoleAccountRepository extends JpaRepository<RoleAccount, RoleAccountId> {
}
|
1
2
3
4
5
6
7
|
package fun.happyhacker.springbootdemo.jpa.idclass.repository;

import fun.happyhacker.springbootdemo.jpa.idclass.entity.Role;
import org.springframework.data.jpa.repository.JpaRepository;

public interface RoleRepository extends JpaRepository<Role, Integer> {
}
|
1
2
3
4
5
6
7
|
package fun.happyhacker.springbootdemo.jpa.idclass.repository;

import fun.happyhacker.springbootdemo.jpa.idclass.entity.Account;
import org.springframework.data.jpa.repository.JpaRepository;

public interface AccountRepository extends JpaRepository<Account, Integer> {
}
|
下面是单元测试
 1
 2
 3
 4
 5
 6
 7
 8
 9
10
11
12
13
14
15
16
17
18
19
20
21
22
23
24
25
26
27
28
29
30
31
32
33
34
35
36
37
38
39
40
41
42
43
44
45
46
47
48
49
50
51
52
53
|
package fun.happyhacker.springbootdemo.jpa.idclass.repository;

import fun.happyhacker.springbootdemo.jpa.idclass.entity.Account;
import fun.happyhacker.springbootdemo.jpa.idclass.entity.Role;
import fun.happyhacker.springbootdemo.jpa.idclass.entity.RoleAccount;
import org.junit.jupiter.api.Test;
import org.springframework.beans.factory.annotation.Autowired;
import org.springframework.boot.test.context.SpringBootTest;

@SpringBootTest
class RoleAccountRepositoryTest {

    @Autowired
    private RoleRepository roleRepository;

    @Autowired
    private AccountRepository accountRepository;

    @Autowired
    private RoleAccountRepository roleAccountRepository;

    @Test
    void idClassTest() {
        Role admin = new Role();
        admin.setId(1);
        admin.setName("admin");

        Role role1 = new Role();
        role1.setId(2);
        role1.setName("role1");

        Role role2 = new Role();
        role2.setId(3);
        role2.setName("role2");

        roleRepository.save(admin);
        roleRepository.save(role1);
        roleRepository.save(role2);

        Account john = new Account();
        john.setAge(30);
        john.setName("john");
        john.setId(4);

        accountRepository.save(john);

        RoleAccount roleAccount = new RoleAccount();
        roleAccount.setRoleId(admin.getId());
        roleAccount.setAccountId(john.getId());

        roleAccountRepository.save(roleAccount);
    }
}
|
@Embeddable和@EmbeddedId
和上面相同的代码就再贴了,只贴不同的文件。
 1
 2
 3
 4
 5
 6
 7
 8
 9
10
11
12
13
|
package fun.happyhacker.springbootdemo.jpa.embeddable.entity;

import lombok.Data;

import javax.persistence.EmbeddedId;
import javax.persistence.Entity;

@Entity
@Data
public class RoleAccount {
    @EmbeddedId
    private RoleAccountId roleAccountId;
}
|
 1
 2
 3
 4
 5
 6
 7
 8
 9
10
11
12
13
|
package fun.happyhacker.springbootdemo.jpa.embeddable.entity;

import lombok.Data;

import javax.persistence.Embeddable;
import java.io.Serializable;

@Data
@Embeddable
public class RoleAccountId implements Serializable {
    private Integer roleId;
    private Integer accountId;
}
|
 1
 2
 3
 4
 5
 6
 7
 8
 9
10
11
12
13
14
15
16
17
18
19
20
21
22
23
24
25
26
27
28
29
30
31
32
33
34
35
36
37
38
39
40
41
42
43
44
45
46
47
48
49
50
51
52
53
54
55
56
|
package fun.happyhacker.springbootdemo.jpa.embeddable.repository;

import fun.happyhacker.springbootdemo.jpa.embeddable.entity.Account;
import fun.happyhacker.springbootdemo.jpa.embeddable.entity.Role;
import fun.happyhacker.springbootdemo.jpa.embeddable.entity.RoleAccount;
import fun.happyhacker.springbootdemo.jpa.embeddable.entity.RoleAccountId;
import org.junit.jupiter.api.Test;
import org.springframework.beans.factory.annotation.Autowired;
import org.springframework.boot.test.context.SpringBootTest;

@SpringBootTest
class RoleAccountRepositoryTest {

    @Autowired
    private RoleRepository roleRepository;

    @Autowired
    private AccountRepository accountRepository;

    @Autowired
    private RoleAccountRepository roleAccountRepository;

    @Test
    void idClassTest() {
        Role admin = new Role();
        admin.setId(1);
        admin.setName("admin");

        Role role1 = new Role();
        role1.setId(2);
        role1.setName("role1");

        Role role2 = new Role();
        role2.setId(3);
        role2.setName("role2");

        roleRepository.save(admin);
        roleRepository.save(role1);
        roleRepository.save(role2);

        Account john = new Account();
        john.setAge(30);
        john.setName("john");
        john.setId(4);

        accountRepository.save(john);

        RoleAccount roleAccount = new RoleAccount();
        RoleAccountId roleAccountId = new RoleAccountId();
        roleAccountId.setRoleId(admin.getId());
        roleAccountId.setAccountId(john.getId());
        roleAccount.setRoleAccountId(roleAccountId);

        roleAccountRepository.save(roleAccount);
    }
}
|
小结
从上面的比较可以看出,最终使用的时候差别不大,都可以对联合主键进行很好的控制。区别在于,如果RoleAccountId类是从别人的jar包中引用的,你无法修改其中的内容,那么就无法添加@Embeddable注解,而这时候用@IdClass就比较简单了。除此之外的其他情况,我认为使用@Embeddable会更清楚一些。
MyBatis——基础用法
MyBatis是面向数据表的,而JPA(Hibernate)则是面向领域对象的,前者更接近数据库,而后者更接近业务。JPA的JpaRepository提供了非常多的内置方法,但面对国内互联网公司灵活多变的需求,这些内置方法还是不够多。这也是为什么MyBatis在国内比较流行的原因,据我了解很多人在用国内的一个封装——MyBatis-Plus。同时,在做这个datalink项目的过程中,我也越来越发现现在这种方式的弊端(复杂、添加schema需要做的事情太多等等),所以以下的MyBatis的例子我们就使用MyBatis-Plus替代。
引入依赖
1
2
3
4
5
|
        <dependency>
            <groupId>com.baomidou</groupId>
            <artifactId>mybatis-plus-boot-starter</artifactId>
            <version>3.4.2</version>
        </dependency>
|
创建表
 1
 2
 3
 4
 5
 6
 7
 8
 9
10
|
DROP TABLE IF EXISTS user;

CREATE TABLE user
(
	id BIGINT(20) NOT NULL COMMENT '主键ID',
	name VARCHAR(30) NULL DEFAULT NULL COMMENT '姓名',
	age INT(11) NULL DEFAULT NULL COMMENT '年龄',
	email VARCHAR(50) NULL DEFAULT NULL COMMENT '邮箱',
	PRIMARY KEY (id)
);
|
填充数据
1
2
3
4
5
6
|
INSERT INTO user (id, name, age, email) VALUES
(1, 'Jone', 18, 'test1@baomidou.com'),
(2, 'Jack', 20, 'test2@baomidou.com'),
(3, 'Tom', 28, 'test3@baomidou.com'),
(4, 'Sandy', 21, 'test4@baomidou.com'),
(5, 'Billie', 24, 'test5@baomidou.com');
|
如果你自己测试用内存数据库h2,这些sql就不需要提前执行,只需要把建表语句schema.sql和数据语句data.sql放在resource目录下,添加以下两行配置即可
1
2
|
spring.datasource.schema=classpath:database/h2/schema.sql
spring.datasource.data=classpath:database/h2/data.sql
|
添加配置
1
2
3
|
spring.datasource.url=jdbc:mysql://localhost:3306/happyhacker?charset=utf8mb4
spring.datasource.hikari.username=root
spring.datasource.hikari.password=12345678
|
创建实体类
 1
 2
 3
 4
 5
 6
 7
 8
 9
10
11
|
package fun.happyhacker.springbootdemo.mybatis.entity;

import lombok.Data;

@Data
public class User {
    private Long id;
    private String name;
    private Integer age;
    private String email;
}
|
创建Mapper
1
2
3
4
5
6
7
8
|
package fun.happyhacker.springbootdemo.mybatis.mapper;

import fun.happyhacker.springbootdemo.mybatis.entity.User;
import org.apache.ibatis.annotations.Mapper;

@Mapper
public interface UserMapper {
}
|
添加方法
接下来就可以在UserMapper类中添加增删改查的方法了。
在UserMapper.java中添加相关方法
1
2
3
4
5
6
7
8
9
|
package fun.happyhacker.springbootdemo.mybatis.mapper;

import fun.happyhacker.springbootdemo.mybatis.entity.User;
import org.apache.ibatis.annotations.Mapper;

@Mapper
public interface UserMapper extends BaseMapper {
    List<User> queryByNameEquals(String userName);
}
|
在resources/fun/happyhacker/springbootdemo/mybatis/mapper中添加UserMapper.xml,内容如下
 1
 2
 3
 4
 5
 6
 7
 8
 9
10
11
12
13
|
<?xml version="1.0" encoding="UTF-8"?>
<!DOCTYPE mapper PUBLIC "-//mybatis.org//DTD Mapper 3.0//EN" "http://mybatis.org/dtd/mybatis-3-mapper.dtd">
<mapper namespace="fun.happyhacker.springbootdemo.mybatis.mapper.UserMapper">
    <resultMap id="user" type="fun.happyhacker.springbootdemo.mybatis.entity.User">
        <id column="id" property="id" javaType="int"/>
        <result column="name" property="name" javaType="String"/>
        <result column="age" property="age" javaType="int"/>
    </resultMap>

    <select id="queryByNameEquals" parameterType="java.lang.String" resultMap="user" resultType="fun.happyhacker.springbootdemo.mybatis.entity.User">
        SELECT * FROM user WHERE `name` = #{userName, jdbcType=VARCHAR}
    </select>
</mapper>
|
注意:UserMapper.xml和UserMapper.java所在的包名一定要相同。
这样就可以以同样的方式调用userMapper.queryByNameEquals(name)方法了。
单元测试
 1
 2
 3
 4
 5
 6
 7
 8
 9
10
11
12
13
14
15
16
17
18
19
20
21
22
23
|
package fun.happyhacker.springbootdemo.mybatis.mapper;

import fun.happyhacker.springbootdemo.mybatis.entity.User;
import org.junit.jupiter.api.Test;
import org.springframework.beans.factory.annotation.Autowired;
import org.springframework.boot.test.context.SpringBootTest;

import java.util.List;

import static org.junit.jupiter.api.Assertions.assertEquals;

@SpringBootTest
class UserMapperTest {
    @Autowired
    private UserMapper userMapper;

    @Test
    void testSelect() {
        List<User> userList = userMapper.queryByNameEquals("Jone");
        assertEquals(1, userList.size());
    }

}
|
如果不想在每个xxxMapper上面写@Mapper注解,可以在启动类上加@MapperScan("fun.happyhacker.springbootdemo.mybatis.mapper"),让系统自动扫描
MyBatis——MyBatis-Plus
上节虽然用的是MyBatis-Plus,但并没有用到任何它独有的特性,下面来介绍一下。
内置方法
前面我们自己写了一个 List<User> queryByNameEquals(String userName);,但实际上这种增删改查的方法已经内置在BaseMapper<T>中了,多数时候我们只需要让UserMapper扩展BaseMapper<User>即可。
代码生成
这个和原生MyBatis的代码生成功能差不多,多出的功能在于它能生成controller、service层的代码,虽然都是空的。而且能生成带lombok的的代码。
这一点其实和国外团队的思路是不同的,他们可能更多的考虑职责分离,克制的加入带有个人主观偏好的功能,但国人开发的MyBatis-Plus则不同,更多从实际开发角度出发考虑问题,而不太关注设计模式。这也很像诸多的Android定制版,国内的各种定制版你可能说它臃肿、不简洁,但你不能说它不好用。
添加依赖
1
2
3
4
5
|
        <dependency>
            <groupId>com.baomidou</groupId>
            <artifactId>mybatis-plus-generator</artifactId>
            <version>3.4.1</version>
        </dependency>
|
编写CodeGenerator.java
 1
 2
 3
 4
 5
 6
 7
 8
 9
10
11
12
13
14
15
16
17
18
19
20
21
22
23
24
25
26
27
28
29
30
31
32
33
34
35
36
37
38
39
40
41
42
43
44
45
46
47
48
49
50
51
52
53
54
55
56
57
58
59
60
61
62
63
64
65
66
67
68
69
70
71
72
73
74
75
76
77
78
79
80
81
82
83
84
|
package fun.happyhacker.springbootdemo.mybatis;

import com.baomidou.mybatisplus.core.exceptions.MybatisPlusException;
import com.baomidou.mybatisplus.core.toolkit.StringUtils;
import com.baomidou.mybatisplus.generator.AutoGenerator;
import com.baomidou.mybatisplus.generator.config.DataSourceConfig;
import com.baomidou.mybatisplus.generator.config.GlobalConfig;
import com.baomidou.mybatisplus.generator.config.PackageConfig;
import com.baomidou.mybatisplus.generator.config.StrategyConfig;
import com.baomidou.mybatisplus.generator.config.rules.NamingStrategy;

import java.util.Scanner;

public class CodeGenerator {
    public static void main(String[] args) {
        AutoGenerator mpg = new AutoGenerator();
        GlobalConfig gc = new GlobalConfig();
        String projectPath = System.getProperty("user.dir") + "/springboot-demo";
        gc.setOutputDir(projectPath + "/src/main/java");
        gc.setAuthor("happyhacker");
        gc.setOpen(false);
        mpg.setGlobalConfig(gc);

        DataSourceConfig dsc = new DataSourceConfig();
        dsc.setUrl("jdbc:mysql://localhost:3306/happyhacker?charset=utf8mb4");
        dsc.setDriverName("com.mysql.cj.jdbc.Driver");
        dsc.setUsername("root");
        dsc.setPassword("12345678");
        mpg.setDataSource(dsc);

        PackageConfig pc = new PackageConfig();
        pc.setModuleName(scanner("模块名"));
        pc.setParent("fun.happyhacker.mybatis");
        mpg.setPackageInfo(pc);

//        InjectionConfig cfg = new InjectionConfig() {
//            @Override
//            public void initMap() {
//
//            }
//        };

//        String templatePath = "/templates/mapper.xml.vm";
//        List<FileOutConfig> focList = new ArrayList<>();
//        focList.add(new FileOutConfig(templatePath) {
//            @Override
//            public String outputFile(TableInfo tableInfo) {
//                return projectPath + "/src/main/resources/mapper/" + pc.getModuleName() + "/" + tableInfo.getEntityName() + "Mapper" + StringPool.DOT_XML;
//            }
//        });
//        cfg.setFileOutConfigList(focList);
//        mpg.setCfg(cfg);
//
//        TemplateConfig templateConfig = new TemplateConfig();
//        templateConfig.setXml(null);
//        mpg.setTemplate(templateConfig);

        StrategyConfig strategyConfig = new StrategyConfig();
        strategyConfig.setNaming(NamingStrategy.underline_to_camel);
        strategyConfig.setColumnNaming(NamingStrategy.underline_to_camel);
//        strategyConfig.setSuperEntityClass("父类Entity,没有可以不用设置");
        strategyConfig.setEntityLombokModel(true);
        strategyConfig.setRestControllerStyle(true);
//        strategyConfig.setSuperControllerClass("父类Controller,没有就不用设置");
        strategyConfig.setSuperEntityColumns("id");
        strategyConfig.setTablePrefix(pc.getModuleName() + "_");
        mpg.setStrategy(strategyConfig);
        mpg.execute();
    }

    private static String scanner(String tip) {
        Scanner scanner = new Scanner(System.in);
        System.out.println("请输入 " + tip + ":");

        if (scanner.hasNext()) {
            String ipt = scanner.next();
            if (StringUtils.isNotBlank(ipt)) {
                return ipt;
            }
        }

        throw new MybatisPlusException("请输入正确的 " + tip + "!");
    }
}
|
测试就不再赘述了。
小结
数据库方面总的来说有JPA和MyBatis两种选择,一般来说国内用MyBatis比较多,这和我们在设计系统时先从数据库开始考虑的思维方式有关系,因为JPA更适应DDD(领域驱动设计)的开发方式,而这种方式在我们实际项目开发中几乎不存在。不过在我看来其实MyBatis-Plus提供的BaseMapper和JPA提供的JpaRepository作用其实差不多,而且后者多数时候更好用。
虽说我个人更倾向于使用JPA,但考虑到国内用户的使用习惯和招聘难度,加上之前项目选择React而不是Vue引起大部分同事的抵触,最终还是决定使用MyBatis。
实际项目中的数据库配置
实际的项目不会像上面那样简单,需要考虑更多的问题
- 多数据库实例,肯定就不能用
spring.datasource.type这种配置了
- 主从分离
得益于dynamic-datasource,我们就不用再费劲的自己通过代码配置数据源和主从分离了,而是简单的通过增加配置即可实现。
回顾
首先让我们来回顾一下前面的经验,要实现一个简单的CRUD,需要如下的class/interface
- Entity ->
User
- Mapper ->
UserMapper
- Service ->
UserService
- ServiceImpl ->
UserServiceImpl
在UserService中,可能存在List<User> allUsers()和int createUser(User user)两个方法,如下
 1
 2
 3
 4
 5
 6
 7
 8
 9
10
11
|
package fun.happyhacker.springbootdemo.mybatis.service;

import fun.happyhacker.springbootdemo.mybatis.entity.User;

import java.util.List;

public interface UserService {
    List<User> listAllUsers();

    int createUser(User user);
}
|
 1
 2
 3
 4
 5
 6
 7
 8
 9
10
11
12
13
14
15
16
17
18
19
20
21
22
23
24
25
26
27
28
29
30
31
32
33
34
|
package fun.happyhacker.springbootdemo.mybatis.service.impl;

import com.baomidou.dynamic.datasource.annotation.DS;
import com.baomidou.mybatisplus.core.conditions.query.QueryWrapper;
import com.baomidou.mybatisplus.extension.service.impl.ServiceImpl;
import fun.happyhacker.springbootdemo.mybatis.entity.User;
import fun.happyhacker.springbootdemo.mybatis.mapper.UserMapper;
import fun.happyhacker.springbootdemo.mybatis.service.UserService;
import org.springframework.stereotype.Service;

import java.util.List;
import java.util.Objects;

@Service
public class UserServiceImpl extends ServiceImpl<UserMapper, User> implements UserService {

    @Override
    @DS("account_slave")
    public List<User> listAllUsers() {
        QueryWrapper<User> wrapper = new QueryWrapper<>();
        wrapper.gt("id", 0);
        return baseMapper.selectList(wrapper);
    }

    @Override
    @DS("account_master")
    public int createUser(User user) {
        if (Objects.isNull(user)) {
            return 0;
        }

        return baseMapper.insert(user);
    }
}
|
你可能已经注意到了这里面的@DS注解,它就是用来配置主从分离的。要实现上述的功能我们需要引入以下依赖
1
2
3
4
5
|
        <dependency>
            <groupId>com.baomidou</groupId>
            <artifactId>dynamic-datasource-spring-boot-starter</artifactId>
            <version>3.3.1</version>
        </dependency>
|
dynamic-datasource的配置比较多,用yaml写会更方便一些
添加数据源相关的配置
 1
 2
 3
 4
 5
 6
 7
 8
 9
10
11
12
13
14
15
16
17
18
19
20
|
spring:
  datasource:
    dynamic:
      hikari:
        connection-timeout: 5000
        leak-detection-threshold: 5000
        max-lifetime: 30000
      primary: account_master
      strict: false
      datasource:
        account_master:
          url: jdbc:mysql://192.168.99.101:3306/account
          username: account
          password: account!
          driver-class-name: com.mysql.cj.jdbc.Driver
        account_slave:
          url: jdbc:mysql://192.168.99.101:3307/account
          username: account_r
          password: account!
          driver-class-name: com.mysql.cj.jdbc.Driver
|
通过这个配置,我们可以很简单的配置主从分离。但这个方法有个致命的问题——分表。它提供了一个TableNameHandler可以用来根据传入的SQL来选择相应的表,看起来很美好,但实际上很难实现,看下代码
 1
 2
 3
 4
 5
 6
 7
 8
 9
10
11
12
13
14
15
16
17
18
19
20
21
22
23
24
25
|
protected String changeTable(String sql) {
        TableNameParser parser = new TableNameParser(sql);
        List<TableNameParser.SqlToken> names = new ArrayList<>();
        parser.accept(names::add);
        StringBuilder builder = new StringBuilder();
        int last = 0;
        for (TableNameParser.SqlToken name : names) {
            int start = name.getStart();
            if (start != last) {
                builder.append(sql, last, start);
                String value = name.getValue();
                TableNameHandler handler = tableNameHandlerMap.get(value);
                if (handler != null) {
                    builder.append(handler.dynamicTableName(sql, value));
                } else {
                    builder.append(value);
                }
            }
            last = name.getEnd();
        }
        if (last != sql.length()) {
            builder.append(sql.substring(last));
        }
        return builder.toString();
    }
|
可以看到,它提供的方法是接收PreparedStatement中的sql部分,通俗点说就是还没有替换变量的SQL,比如我们要通过其中的uid字段以uid%128作为表名的后缀,通过这种方式就很难实现了。所以下一步就要祭出大杀器Apache ShardingSphere,它提供了针对分库分表的一整套解决方案。在实际应用中,我们只关心ShardingSphere-JDBC即可。
ShardingSphere-JDBC
在开始介绍之前,首先设定一个场景。
假设我们的项目是要处理订单,由于订单很多,需要不仅要分表还要分库。为了简化问题,我们就分成2个库,每个库4张表,每个库一主一从。
orders_0 主库,包含表t_orders_0, t_orders_2, t_orders_4, t_orders_8orders_1 主库,包含表 t_orders_1, t_orders_3, t_orders_5, t_orders_7slave_0 从库,包含表t_orders_0, t_orders_2, t_orders_4, t_orders_8slave_1从库,包含表 t_orders_1, t_orders_3, t_orders_5, t_orders_7- 根据
user_id分库,库名后缀为user_id%2,后缀可选范围为0和1
- 根据
user_id分表,表名后缀为user_id%8,后缀可选范围为0-7
- 为了演示不需要分表的场景,添加一个
t_order_config表,位于orders_0主库和orders_0从库
启动数据库服务
 1
 2
 3
 4
 5
 6
 7
 8
 9
10
11
12
13
14
15
16
17
18
19
20
21
22
23
24
25
26
27
28
29
30
31
32
33
34
35
36
37
38
39
40
41
42
43
44
45
46
47
48
49
50
51
52
53
|
version: "3.3"
services:

  db-3306:
    image: mysql:latest
    restart: always
    ports:
      - "3306:3306"
    volumes:
      - "3306:/var/lib/mysql:rw"
    environment:
      MYSQL_ALLOW_EMPTY_PASSWORD: "yes"
      MYSQL_ROOT_PASSWORD: "root"


  db-3307:
    image: mysql:latest
    restart: always
    ports:
      - "3307:3306"
    volumes:
      - "3307:/var/lib/mysql:rw"
    environment:
      MYSQL_ALLOW_EMPTY_PASSWORD: "yes"
      MYSQL_ROOT_PASSWORD: "root"

  db-3308:
    image: mysql:latest
    restart: always
    ports:
      - "3308:3306"
    volumes:
      - "3308:/var/lib/mysql:rw"
    environment:
      MYSQL_ALLOW_EMPTY_PASSWORD: "yes"
      MYSQL_ROOT_PASSWORD: "root"

  db-3309:
    image: mysql:latest
    restart: always
    ports:
      - "3309:3306"
    volumes:
      - "3309:/var/lib/mysql:rw"
    environment:
      MYSQL_ALLOW_EMPTY_PASSWORD: "yes"
      MYSQL_ROOT_PASSWORD: "root"

volumes:
  "3306":
  "3307":
  "3308":
  "3309":
|
使用上面的docker-compose.yml文件,启动数据库服务
得到4个数据库端口。对应关系如下表
| 端口 |
库名 |
主/从 |
| 3306 |
orders_0 |
主 |
| 3307 |
orders_1 |
主 |
| 3308 |
slave_0 |
从 |
| 3309 |
slave_1 |
从 |
建表
在3306和3308端口执行以下SQL语句
 1
 2
 3
 4
 5
 6
 7
 8
 9
10
11
12
13
14
15
16
17
18
19
20
21
22
23
24
25
26
27
28
29
30
31
32
33
34
35
36
37
38
39
40
41
42
43
44
45
46
47
48
49
50
51
52
53
54
55
56
57
58
|
create database orders_0;
use orders_0;

SET NAMES utf8mb4;
SET FOREIGN_KEY_CHECKS = 0;

-- ----------------------------
-- Table structure for t_orders_0
-- ----------------------------
DROP TABLE IF EXISTS `t_orders_0`;
CREATE TABLE `t_orders_0` (
                            `id` bigint(11) NOT NULL AUTO_INCREMENT COMMENT '订单编号',
                            `user_id` int(16) DEFAULT NULL COMMENT '用户编号',
                            PRIMARY KEY (`id`)
) ENGINE=InnoDB AUTO_INCREMENT=8 DEFAULT CHARSET=utf8mb4 COLLATE=utf8mb4_bin COMMENT='订单表';

-- ----------------------------
-- Table structure for t_orders_2
-- ----------------------------
DROP TABLE IF EXISTS `t_orders_2`;
CREATE TABLE `t_orders_2` (
                            `id` bigint(11) NOT NULL AUTO_INCREMENT COMMENT '订单编号',
                            `user_id` int(16) DEFAULT NULL COMMENT '用户编号',
                            PRIMARY KEY (`id`)
) ENGINE=InnoDB AUTO_INCREMENT=8 DEFAULT CHARSET=utf8mb4 COLLATE=utf8mb4_bin COMMENT='订单表';

-- ----------------------------
-- Table structure for t_orders_4
-- ----------------------------
DROP TABLE IF EXISTS `t_orders_4`;
CREATE TABLE `t_orders_4` (
                            `id` bigint(11) NOT NULL AUTO_INCREMENT COMMENT '订单编号',
                            `user_id` int(16) DEFAULT NULL COMMENT '用户编号',
                            PRIMARY KEY (`id`)
) ENGINE=InnoDB AUTO_INCREMENT=8 DEFAULT CHARSET=utf8mb4 COLLATE=utf8mb4_bin COMMENT='订单表';

-- ----------------------------
-- Table structure for t_orders_6
-- ----------------------------
DROP TABLE IF EXISTS `t_orders_6`;
CREATE TABLE `t_orders_6` (
                            `id` bigint(11) NOT NULL AUTO_INCREMENT COMMENT '订单编号',
                            `user_id` int(16) DEFAULT NULL COMMENT '用户编号',
                            PRIMARY KEY (`id`)
) ENGINE=InnoDB AUTO_INCREMENT=8 DEFAULT CHARSET=utf8mb4 COLLATE=utf8mb4_bin COMMENT='订单表';

-- ----------------------------
-- Table structure for order_config
-- ----------------------------
DROP TABLE IF EXISTS `t_order_config`;
CREATE TABLE `t_order_config` (
                                `id` int(11) NOT NULL AUTO_INCREMENT COMMENT '编号',
                                `pay_timeout` int(11) DEFAULT NULL COMMENT '支付超时时间;单位:分钟',
                                PRIMARY KEY (`id`)
) ENGINE=InnoDB DEFAULT CHARSET=utf8mb4 COLLATE=utf8mb4_bin COMMENT='订单配置表';


SET FOREIGN_KEY_CHECKS = 1;
|
在3307和3309端口执行以下SQL语句
 1
 2
 3
 4
 5
 6
 7
 8
 9
10
11
12
13
14
15
16
17
18
19
20
21
22
23
24
25
26
27
28
29
30
31
32
33
34
35
36
37
38
39
40
41
42
43
44
45
46
47
|
create database orders_1;
use orders_1;

SET NAMES utf8mb4;
SET FOREIGN_KEY_CHECKS = 0;

-- ----------------------------
-- Table structure for t_orders_1
-- ----------------------------
DROP TABLE IF EXISTS `t_orders_1`;
CREATE TABLE `t_orders_1` (
                            `id` bigint(11) NOT NULL AUTO_INCREMENT COMMENT '订单编号',
                            `user_id` int(16) DEFAULT NULL COMMENT '用户编号',
                            PRIMARY KEY (`id`)
) ENGINE=InnoDB AUTO_INCREMENT=400675304294580226 DEFAULT CHARSET=utf8mb4 COLLATE=utf8mb4_bin COMMENT='订单表';

-- ----------------------------
-- Table structure for t_orders_3
-- ----------------------------
DROP TABLE IF EXISTS `t_orders_3`;
CREATE TABLE `t_orders_3` (
                            `id` bigint(11) NOT NULL AUTO_INCREMENT COMMENT '订单编号',
                            `user_id` int(16) DEFAULT NULL COMMENT '用户编号',
                            PRIMARY KEY (`id`)
) ENGINE=InnoDB AUTO_INCREMENT=8 DEFAULT CHARSET=utf8mb4 COLLATE=utf8mb4_bin COMMENT='订单表';

-- ----------------------------
-- Table structure for t_orders_5
-- ----------------------------
DROP TABLE IF EXISTS `t_orders_5`;
CREATE TABLE `t_orders_5` (
                            `id` bigint(11) NOT NULL AUTO_INCREMENT COMMENT '订单编号',
                            `user_id` int(16) DEFAULT NULL COMMENT '用户编号',
                            PRIMARY KEY (`id`)
) ENGINE=InnoDB AUTO_INCREMENT=8 DEFAULT CHARSET=utf8mb4 COLLATE=utf8mb4_bin COMMENT='订单表';

-- ----------------------------
-- Table structure for t_orders_7
-- ----------------------------
DROP TABLE IF EXISTS `t_orders_7`;
CREATE TABLE `t_orders_7` (
                            `id` bigint(11) NOT NULL AUTO_INCREMENT COMMENT '订单编号',
                            `user_id` int(16) DEFAULT NULL COMMENT '用户编号',
                            PRIMARY KEY (`id`)
) ENGINE=InnoDB AUTO_INCREMENT=8 DEFAULT CHARSET=utf8mb4 COLLATE=utf8mb4_bin COMMENT='订单表';

SET FOREIGN_KEY_CHECKS = 1;
|
配置依赖
 1
 2
 3
 4
 5
 6
 7
 8
 9
10
|
        <dependency>
            <groupId>com.baomidou</groupId>
            <artifactId>mybatis-plus-boot-starter</artifactId>
            <version>3.4.2</version>
        </dependency>
        <dependency>
            <groupId>org.apache.shardingsphere</groupId>
            <artifactId>sharding-jdbc-spring-boot-starter</artifactId>
            <version>4.1.1</version>
        </dependency>
|
编写相应的POJO
Entity
 1
 2
 3
 4
 5
 6
 7
 8
 9
10
11
|
package fun.happyhacker.springbootdemo.mybatis.orders.entity;

import com.baomidou.mybatisplus.annotation.TableName;
import lombok.Data;

@Data
@TableName(value = "t_orders")
public class Order {
    private Integer id;
    private Integer userId;
}
|
 1
 2
 3
 4
 5
 6
 7
 8
 9
10
11
12
13
|
package fun.happyhacker.springbootdemo.mybatis.orders.entity;

import com.baomidou.mybatisplus.annotation.TableName;
import lombok.Data;

import java.time.LocalDateTime;

@Data
@TableName(value = "t_order_config")
public class OrderConfig {
    private Integer id;
    private LocalDateTime pay_timeout;
}
|
Mapper
1
2
3
4
5
6
7
8
9
|
package fun.happyhacker.springbootdemo.mybatis.orders.mapper;

import com.baomidou.mybatisplus.core.mapper.BaseMapper;
import fun.happyhacker.springbootdemo.mybatis.orders.entity.OrderConfig;
import org.apache.ibatis.annotations.Mapper;

@Mapper
public interface OrderConfigMapper extends BaseMapper<OrderConfig> {
}
|
 1
 2
 3
 4
 5
 6
 7
 8
 9
10
|
package fun.happyhacker.springbootdemo.mybatis.orders.mapper;

import com.baomidou.mybatisplus.core.mapper.BaseMapper;
import fun.happyhacker.springbootdemo.mybatis.orders.entity.Order;
import org.apache.ibatis.annotations.Mapper;

@Mapper
public interface OrderMapper extends BaseMapper<Order> {
    Order selectByUserId(Integer userId);
}
|
XML Mapper
1
2
3
4
5
6
7
|
<?xml version="1.0" encoding="UTF-8"?>
<!DOCTYPE mapper PUBLIC "-//mybatis.org//DTD Mapper 3.0//EN" "http://mybatis.org/dtd/mybatis-3-mapper.dtd">
<mapper namespace="fun.happyhacker.springbootdemo.mybatis.orders.mapper.OrderMapper">
    <select id="selectByUserId" parameterType="Integer" resultType="Order">
        select * from t_orders where user_id = #{userId} order by id desc limit 1
    </select>
</mapper>
|
Service 和 ServiceImpl
1
2
3
4
5
6
7
|
package fun.happyhacker.springbootdemo.mybatis.orders.service;

import com.baomidou.mybatisplus.extension.service.IService;
import fun.happyhacker.springbootdemo.mybatis.orders.entity.OrderConfig;

public interface OrderConfigService extends IService<OrderConfig> {
}
|
 1
 2
 3
 4
 5
 6
 7
 8
 9
10
11
|
package fun.happyhacker.springbootdemo.mybatis.orders.service;

import com.baomidou.mybatisplus.extension.service.IService;
import fun.happyhacker.springbootdemo.mybatis.orders.entity.Order;
import org.apache.ibatis.annotations.Param;

public interface OrderService extends IService<Order> {
    Order selectByUserId(@Param("userId") Integer userId);

    Order selectAndUpdate(@Param("userId") Integer userId);
}
|
 1
 2
 3
 4
 5
 6
 7
 8
 9
10
11
|
package fun.happyhacker.springbootdemo.mybatis.orders.service.impl;

import com.baomidou.mybatisplus.extension.service.impl.ServiceImpl;
import fun.happyhacker.springbootdemo.mybatis.orders.entity.OrderConfig;
import fun.happyhacker.springbootdemo.mybatis.orders.mapper.OrderConfigMapper;
import fun.happyhacker.springbootdemo.mybatis.orders.service.OrderConfigService;
import org.springframework.stereotype.Service;

@Service
public class OrderConfigServiceImpl extends ServiceImpl<OrderConfigMapper, OrderConfig> implements OrderConfigService {
}
|
 1
 2
 3
 4
 5
 6
 7
 8
 9
10
11
12
13
14
15
16
17
18
19
20
21
22
23
24
25
26
27
28
|
package fun.happyhacker.springbootdemo.mybatis.orders.service.impl;

import com.baomidou.mybatisplus.extension.service.impl.ServiceImpl;
import fun.happyhacker.springbootdemo.mybatis.orders.entity.Order;
import fun.happyhacker.springbootdemo.mybatis.orders.mapper.OrderMapper;
import fun.happyhacker.springbootdemo.mybatis.orders.service.OrderService;
import lombok.extern.log4j.Log4j2;
import org.springframework.stereotype.Service;
import org.springframework.transaction.annotation.Transactional;

@Service
@Log4j2
public class OrderServiceImpl extends ServiceImpl<OrderMapper, Order> implements OrderService {
    @Override
    public Order selectByUserId(Integer userId) {
        return baseMapper.selectByUserId(userId);
    }

    @Transactional
    @Override
    public Order selectAndUpdate(Integer userId) {
        Order aOrder = new Order();
        aOrder.setUserId(20);
        baseMapper.insert(aOrder);

        return baseMapper.selectByUserId(20);
    }
}
|
应用配置
 1
 2
 3
 4
 5
 6
 7
 8
 9
10
11
12
13
14
15
16
17
18
19
20
21
22
23
24
25
26
27
28
29
30
31
32
33
34
35
36
37
38
39
40
41
42
43
44
45
46
47
48
49
50
51
52
53
54
55
56
57
58
59
60
61
62
63
64
65
66
67
68
69
70
71
72
73
74
75
76
77
78
|
server:
  port: 8080
spring:
  shardingsphere:
    datasource:
      names: master0, master1, slave0, slave1
      master0:
        type: com.zaxxer.hikari.HikariDataSource
        driver-class-name: com.mysql.cj.jdbc.Driver
        jdbcUrl: jdbc:mysql://192.168.99.101:3306/orders_0?charset=utf8mb4&allowPublicKeyRetrieval=true&useSSL=false
        username: root
        password: root
      master1:
        type: com.zaxxer.hikari.HikariDataSource
        driver-class-name: com.mysql.cj.jdbc.Driver
        jdbcUrl: jdbc:mysql://192.168.99.101:3307/orders_1?charset=utf8mb4&allowPublicKeyRetrieval=true&useSSL=false
        username: root
        password: root
      slave0:
        type: com.zaxxer.hikari.HikariDataSource
        driver-class-name: com.mysql.cj.jdbc.Driver
        jdbcUrl: jdbc:mysql://192.168.99.101:3308/orders_0?charset=utf8mb4&allowPublicKeyRetrieval=true&useSSL=false
        username: root
        password: root
      slave1:
        type: com.zaxxer.hikari.HikariDataSource
        driver-class-name: com.mysql.cj.jdbc.Driver
        jdbcUrl: jdbc:mysql://192.168.99.101:3309/orders_1?charset=utf8mb4&allowPublicKeyRetrieval=true&useSSL=false
        username: root
        password: root
    sharding:
      tables:
        t_orders:
          key-generator:
            column: id
            type: SNOWFLAKE
          actual-data-nodes: ds0.t_orders_$->{[0,2,4,6]}, ds1.t_orders_$->{[1,3,5,7]}
          table-strategy:
            inline:
              algorithm-expression: t_orders_$->{user_id % 8}
              sharding-column: user_id
          database-strategy:
            inline:
              algorithm-expression: ds$->{user_id % 2}
              sharding-column: user_id
        t_order_config:
          actual-data-nodes: ds0.t_order_config

      master-slave-rules:
        ds0:
          master-data-source-name: master0
          slave-data-source-names: slave0
        ds1:
          master-data-source-name: master1
          slave-data-source-names: slave1

      default-database-strategy:
        inline:
          sharding-column: user_id
          algorithm-expression: master$->{user_id % 2}

    props:
      log:
        show: true # 在日志中打印执行过程
      sql:
        show: true # 打印Logic SQL和 Actual SQL,非常方便排查问题


mybatis-plus:
  configuration:
    map-underscore-to-camel-case: true # 类属性中的驼峰字段到数据库中的下划线字段
  global-config:
    db-config:
      id-type: none
      logic-delete-value: 1
      logic-not-delete-value: 0
  mapper-locations: classpath*:mapper/*.xml # 搜索resources/mapper/目录下的XML文件作为Mapper
  type-aliases-package: fun.happyhacker.springbootdemo.mybatis.orders # 使XML Mapper中可以直接使用短类名,而不需要包名
|
上面的配置文件展示了需要和不需要分库分表的情况下的不同配置,理清楚之后也很清晰。一定要注意的是database-strategy的值引用的是spring.shardingsphere.datasource.names中的值,而不是实际的库名。
*-strategy.algorithm-expression是Groovy脚本,本身Apache ShardingSphere支持两种写法
master${user_id % 2}master$->{user_id % 2}
但第一种方式在Spring环境中会被认为user_id % 2是一个变量名而不是表达式,所以在Spring环境中需要使用第二种方式。
事务
上面的代码中有一个方法标记了@Transactional,表明是支持事务的。在本例中,插入数据之后后面的方法也会去相应的主库中查找对应的数据而不是去从库中查,你可以把@Transactional注解移除验证一下。
总结
关于数据库的所有内容到这里就结束了,我们从最基础的JDBC开始学习,了解了主流的JPA和MyBatis的基础用法,以及在使用这些框架时实际遇到的问题,后面引入了MyBatis-Plus来消除模板代码,使用内置的方法减少代码量。
在介绍主从分离和分库分表时我们遇到了挑战,使用Dynamic-Datasource不能解决问题,因此我们引入了Apache ShardingSphere来解决。问中给出了非常详细的代码,希望对你的学习有帮助。